Snowfakery Documentation
Snowfakery is a tool for generating fake data that has relations between tables. Every row is faked data, but also unique and random, like a snowflake.
To tell Snowfakery what data to generate, write a recipe file in YAML.
Snowfakery can write its output to stdout, or any database accessible to SQLAlchemy. When it is embedded in CumulusCI, it can output to a Salesforce org. Adding new output formats is a fairly straightforward process.
Installation
Installation for Salesforce Users
If you intend to use Snowfakery with Salesforce, we recommend installing CumulusCI, which includes Snowfakery in the installation. To install CumulusCI, follow the steps in the Get Started section of the CumulusCI documentation. (Don't forget to install Python, too!)
After installation, from your development environment of choice (e.g. VS Code), create a Snowfakery recipe file in your working directory (with a file extension .yml). Then, open a terminal and use the snowfakery task command to invoke Snowfakery, referencing the file you just created. Of course, you will want your recipe to include good instructions. We'll cover that in the rest of this documentation!
$ snowfakery somefile.yml
...
Installation for Non-Salesforce Users
If you are not interested in using Snowfakery with Salesforce, directly install Snowfakery via pipx.
$ pip3 install pipx
...
$ pipx install snowfakery
...
After installation, from your development environment of choice (e.g. VS Code), create a Snowfakery recipe file recipe file in your working directory (with a file extension .yml). Then, open a terminal and use the snowfakery task command to invoke Snowfakery, referencing the file you just created. Of course, you will want your recipe to include good instructions. We'll cover that in the rest of this documentation!
After installation, use the snowfakery task command to invoke Snowfakery.
$ snowfakery somefile.yml
...
Central Concepts
Snowfakery recipes are specified in the simple, human-readable YAML format. A YAML file is designated by the .yml extension.
They typically begin with a version declaration to say which version of the snowfakery language you want to use. The current version is 3 and new recipes should use it.
Let's start with a stupidly simple recipe named simple_static.yml. In this example, you can see that YAML uses indentation to define what parts of the file are related to each other.
- snowfakery_version: 3
- object: Person
  fields:
    name: Buster Bluth
    age: 35
To create a record with this data, run the snowfakery task command with the recipe name.
$ snowfakery docs/examples/simple_static.yml
...
This simple example generates a single record, a Person with three fields.
Person(id=1, name=Buster Bluth, age=35)
Two of the fields, name and age, include data from the YAML file. The id field is auto-generated by Snowfakery.
| Field | id | name | age |
|---|---|---|---|
| Value | 1 | Buster Bluth | 35 |
.. note::
Snowfakery only works for models that are amenable to including an id field for every record. Your tools can use the id column, ignore the id column, or exchange the id column for another kind of ID (like CumulusCI does with Salesforce), but Snowfakery always generates an ID for each record, and refers between tables with IDs. (Future versions are expected to include a command line option to turn this behavior on or off.)
Let's make a new recipe named persons_of_interest.yml that requires Snowfakery to do some automation.
- snowfakery_version: 3
- object: Person
  count: 3
  fields:
    name:
      fake: name
    age:
      random_number:
        min: 12
        max: 95
Here's a breakdown for each step of this recipe.
object: Person: Creates a record template for any rows generated in thePersontable representing real-worldPersonobjects.count: 3: Creates threePersonrecords.name: fake: name: Generates a fake name for thenamecolumn instead of requiring you to manually enter one. The list of things you can fake is based on a library called Faker, which is discussed later in this documentation.age: random_number: Generates a random number between theminand themaxvalues.
To run this recipe:
$ snowfakery docs/examples/persons_of_interest.yml
...
Let's look at what this recipe (randomly) generates.
Person(id=1, name=Allison Garcia, age=94)
Person(id=2, name=Megan Campos, age=67)
Person(id=3, name=Katherine Nelson, age=92)
We've created people! Or at least fake personas for people! And every time you run the recipe, you get a different set of "people".
While that's pretty cool, it doesn't use much of Snowfakery's power. Let's go deeper with a recipe named pet_stories.yml.
- snowfakery_version: 3
- object: Person
  count: 3
  fields:
    name:
      fake: name
    age:
      random_number:
        min: 12
        max: 95
    dog:
      - object: Animal
        fields:
          name:
            fake: FirstName
          species: canine
          food:
            - object: PetFood
              fields:
                name: Pets Choice
                cost: $10

    cat:
      - object: Animal
        fields:
          name:
            fake: FirstName
          species: feline
          food:
            - object: PetFood
              fields:
                name: Pets Choice
                cost: $1
If you're lost, don't worry. There are a lot of new concepts in this recipe, so let's tackle them one by one. In this example:
- Three
Personobjects are created with thecountfunction. - Each
Personhas aname, anage, adog, and acat. - Each
dogorcatis anAnimalrow. - If each
Personhas two animals, there are a total of sixAnimalobjects. - If each animal has a favorite food, there are a total of six
PetFoodobjects.
To run this recipe:
$ snowfakery docs/examples/pet_stories.yml
...
Here's a visual example of the output.
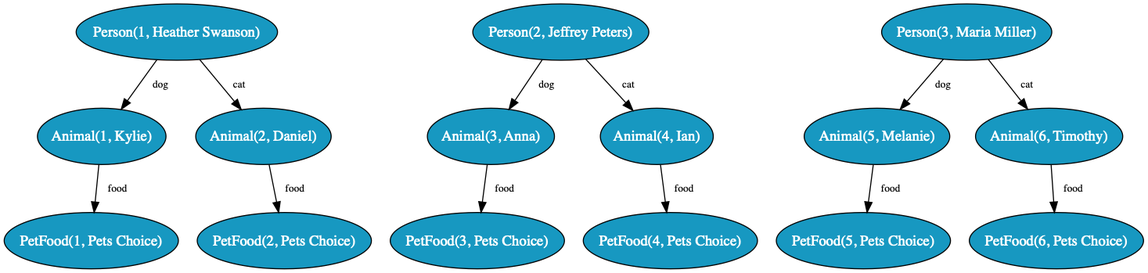
Later, we discuss how to create two PetFood objects that are shared, and how to generate a random value for species and food.
Outputs
Snowfakery builds on a tool called SQLAlchemy, which provides a variety of database connectors.
When integrated with CumulusCI, it's possible for Snowfakery to output to a Salesforce instance. To learn more about integration with CumulusCI, see Advanced Features.
Snowfakery can also output JSON, SQL, directories of CSV, and object diagrams. CSV output goes to a directory with one CSV file per table and a JSON manifest file in the csvw format.
This is a complete list of file-based (as opposed to database-based) formats.
- JSON: A custom JSON dialect
- TXT: A debugging-style output
- CSV: A directory of CSV files plus a csvw file
- SQL: A SQL file with
CREATE TABLEandINSERTstatements - DOT: A graphviz file for use with the graphviz command line or web-based tools
- SVG, SVGZ, JPEG, and PS PNG: Graphic formats that can be created if graphviz is installed
Objects
The core concept of Snowfakery is an object template. The object template represents instructions on how to create a row (or multiple rows) in a database. Rows, also known as records, in turn represent real-world entities such as people, places, or things, which is why we use the keyword object.
Each row has a type, a value that represents the name of the table that the row is added to in a relational database, or which CSV file the row is placed in. You declare the type after the keyword object.
As in an Object Relational system, think of objects or rows as synonyms. Rows are how we represent objects in tables or files. Records is another word synonymous with objects and rows in Salesforce.
Each row that is generated by Snowfakery is given a unique ID.
Let's revisit the person_of_interest.yml recipe.
- object: Person
  count: 10
  fields:
    name:
      fake: name
    age:
      random_number:
        min: 12
        max: 95
These are the main properties of this Object Template.
objectis a type declaration that determines what table or file the row goes in.countdetermines how many rows are made. It can be randomized or computed using Function Blocks or the Formula Language.fieldsdetermine what data values to put in the row.
You can also have more than one Object Template for any row type, such as a relational table, CSV file, Salesforce Object, and so on.
Let's add a second object to the person_of_interest.yml recipe.
- object: Person
  count: 3
  fields:
    name:
      fake: name
    age:
      random_number:
        min: 12
        max: 95
- object: Person
  count: 3
  fields:
    name:
      fake: name
    age:
      random_number:
        min: 0
        max: 12
Now there are six Person rows generated in the Person table (or file)--three between ages 0 and 12, and three between ages 12 and 95.
Fake Data
To generate fake data with the fake function:
- object: Account
  fields:
    Name:
      fake: Company
    Description:
      fake: CatchPhrase
    BillingStreet:
      fake: StreetAddress
    BillingCity:
      fake: City
    BillingState:
      fake: State
You can fake all sorts of data: names, addresses, Latin text, English sentences, URLs, and so much more. To see the complete list, along with other related features, see the Fake Data Tutorial
friends
To create a rule such as "For every Person created, create two Animals", use the friends feature.
- object: Person
  count: 3
  fields:
    name:
      fake: name
    age:
      random_number:
        min: 12
        max: 95
  friends: # I get by with a little help from my...
    - object: Animal
      count: 2
      fields:
        name:
          fake: FirstName
This recipe outputs two animals per person.
Person(id=1, name=Sierra Ortega, age=91)
Animal(id=1, name=Sarah)
Animal(id=2, name=Brian)
Person(id=2, name=Robert Haley, age=42)
Animal(id=3, name=Michele)
Animal(id=4, name=Jonathan)
Person(id=3, name=Jason White, age=35)
Animal(id=5, name=John)
Animal(id=6, name=Kimberly)
![]()
There is no explicit relationship between the animals and the people in this example, but sometimes you need an implicit "relationship" between the number of one object created and the number of the other.
You can also use this feature for Many to One.
Relationships
Relationships are a big part of what separates Snowfakery from the dozens(!) of data generation tools out there.
Let's relate pets to their owners with ease in a recipe named person_pet.yml.
- object: Person
  count: 3
  fields:
    name:
      fake: name
    pet:
      - object: Animal
        fields:
          name:
            fake: FirstName
          species: Petaurus Breviceps
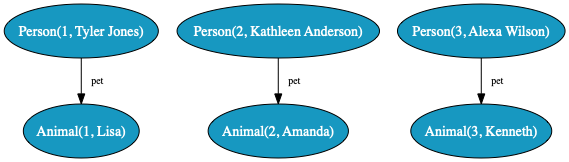
Now each of the Person rows has a Sugar glider for a pet (which is a good thing, as long as they know how to take care of them).
Let's look at what this recipe (randomly) generates.
Person(id=1, name=Rachel Thompson, pet=Animal(1))
Animal(id=2, name=Charles, species=Petaurus Breviceps)
Person(id=2, name=Alexander Zhang, pet=Animal(2))
Animal(id=3, name=Thomas, species=Petaurus Breviceps)
Person(id=3, name=Lisa King, pet=Animal(3))
In addition, we can relate pets and owners "bidirectionally" with the reference feature.
Let's use the reference feature in a recipe named secret_life_of_pets.yml.
# snowfakery/docs/examples/secret_life_of_pets.yml
- snowfakery_version: 3
- object: Person
  count: 3
  fields:
    name:
      fake: name
    pet:
      - object: Animal
        fields:
          name:
            fake: FirstName
          owner:
            reference: Person
Now Person has a pet field that refers to an Animal row. Each Animal row has an owner field that refers back to the Personrow. It's called a bidirectional relationship--because it goes both ways. Of course, not all relationships are bi, but sometimes it's what your schema demands.
Let's look at what this recipe (randomly) generates.
Animal(id=1, name=Nicole, owner=Person(1))
Person(id=1, name=Steven Ellis, pet=Animal(1))
Animal(id=2, name=Richard, owner=Person(2))
Person(id=2, name=Chad Delacruz, pet=Animal(2))
Animal(id=3, name=Tammie, owner=Person(3))
Person(id=3, name=Corey Zamora, pet=Animal(3))
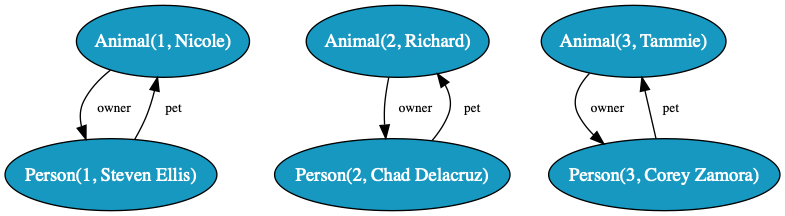
The relationship from Person to Animal is called pet. It's expressed by embedding the Object Template for Animal in the field named pet.
The relationship from Animal to Person is called owner. It's expressed by the reference function. This function searches the YAML tree for the relevant Person row.
You can also use the nickname property to express a relationship between two rows that are not directly related in the hierarchy. For example, here's a recipe named pet_stories_2.yml.
- object: PetFood
  nickname: petschoice
  fields:
    name: Pets Choice
    cost: $10

- object: PetFood
  nickname: vetschoice
  fields:
    name: Vets Choice
    cost: $12

- object: Person
  count: 3
  fields:
    name:
      fake: name
    dog:
      - object: Animal
        nickname: dog
        fields:
          owner:
            reference: Person
          name:
            fake: FirstName
          species: canine
          food:
            reference: petschoice

    cat:
      - object: Animal
        fields:
          owner: Person
          name:
            fake: FirstName
          species: feline
          nemesis: dog
          food:
            reference: vetschoice
Let's look at what this recipe (randomly) generates.
PetFood(id=1, name=Pets Choice, cost=$10)
PetFood(id=2, name=Vets Choice, cost=$12)
Animal(id=1, owner=Person, name=Dustin, species=canine, food=PetFood(1))
Animal(id=2, owner=Person, name=Edwin, species=feline, nemesis=dog, food=PetFood(2))
Person(id=1, name=Antonio Martin, dog=Animal(1), cat=Animal(2))
Animal(id=3, owner=Person, name=Kristy, species=canine, food=PetFood(1))
Animal(id=4, owner=Person, name=Bryan, species=feline, nemesis=dog, food=PetFood(2))
Person(id=2, name=Hunter Wright, dog=Animal(3), cat=Animal(4))
Animal(id=5, owner=Person, name=Gregory, species=canine, food=PetFood(1))
Animal(id=6, owner=Person, name=Veronica, species=feline, nemesis=dog, food=PetFood(2))
Person(id=3, name=Rebecca Williams, dog=Animal(5), cat=Animal(6))
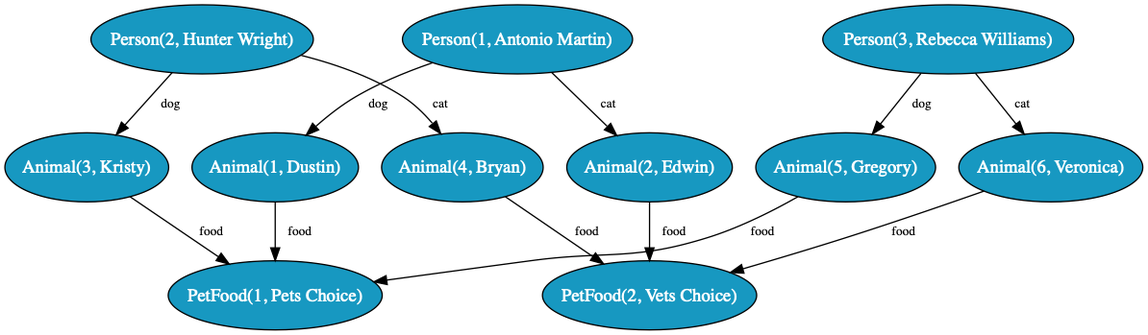
Funky!
The basic rule is that the last row (object) created with the nickname is the one that's referenced.
Function Blocks
Fields can refer to functions that randomize, compute or look up data. You do that by nesting the function name under the field name, or with formulas.
reference
The reference function lets you look up another row (object) and make a reference to it. For example:
- object: Animal
  fields:
    name:
      fake: FirstName
    owner:
      reference: Person
The reference function looks for another object by table name (Person, in this example), or a nicknamed object by nickname.
If an object is created earlier in the recipe, and it has the appropriate nickname or tablename property, that object is the target reference.
Otherwise, the reference can be to an object hasn't been created yet. Snowfakery generates an ID for the object so that the current row can be generated--only no other properties of this new object can be referred to, because it does not exist yet.
If the reference value contains periods, Snowfakery follows field names to get to the final name. The first name before the first "." can either be a field name or an object name.
- object: cat
  nickname: Fluffy
  fields:
    color: black

- object: fiance
  nickname: sam
  fields:
    pet:
      reference: Fluffy

- object: betrothed
  fields:
    spouse:
      reference: sam
    pet:
      reference: spouse.pet
    color: ${{pet.color}}
Snowfakery (and CumulusCI) lets you loop over a recipe many times to generate multiple rows. In this case, a reference is always to an object created within the current iteration of a recipe. The exception to this rule are objects marked with the just_once property. These objects are created only in the first iteration, and any references to them are solely to the objects created in that first iteration.
random_choice
The random_choice function randomly chooses an option from a list.
Payment_Method:
  random_choice:
    - Cash
    - Cheque
    - Credit Card
random_choice evens the odds of its random selection unless you enter specific odds as a percentage.
StageName:
  random_choice:
    Closed Won: 60%
    In Progress: 20%
    New: 20%
To learn how to do more sophisticated randomness with features, read the Random Weights That Are Not Percentages section.
random_choice can also be used to randomly select potential child objects.
- object: Task
  fields:
    person_doing_the_task:
      random_choice:
        - object: Contact
          fields:
            FirstName: Bart
            LastName: Simpson
        - object: Lead
          fields:
            FirstName: Marge
            LastName: Simpson
A more sophisticated syntax lets you combine probabilities with values that are more complex than simple strings.
Let's explore this syntax with a recipe named random-choice-complex.yml.
# examples/random-choice-complex.yml
- snowfakery_version: 3
- object: Task
  count:
    random_choice:
      - choice:
          probability: 30%
          pick: 1
      - choice:
          probability: 30%
          pick: 3
      - choice:
          probability: 30%
          pick: 10
  fields:
    person_doing_the_task:
      random_choice:
        - choice:
            probability: 40%
            pick:
              - object: Contact
                fields:
                  FirstName: Bart
                  LastName: Simpson
        - choice:
            probability: 40%
            pick:
              - object: Contact
                fields:
                  FirstName: Marge
                  LastName: Simpson
        - choice:
            probability: 20%
            pick:
              - object: Contact
                fields:
                  FirstName: Lisa
                  LastName: Simpson
random_reference
The random_reference property creates a reference to a random, existing row from a table.
- object: Owner
  count: 10
  fields:
    name:
      fake: Name
- object: Pet
  count: 10
  fields:
    ownedBy:
      random_reference: Owner
To create a reference, random_reference looks for a row created in the current iteration of the recipe and matching the specified object type or nickname. In the above recipe, each random_reference specified in ownedBy will point to one of the ten Owner objects created in the same iteration. If you iterate over the recipe multiple times, in other words, each Pet object will be matched with one of the ten Owner objects created during the same iteration.
If random_reference finds no matches in the current iteration, it looks in previous iterations. This can happen, for example, when you try to create a reference to an object created with the just_once flag. Snowfakery cannot currently generate a random_reference to a row that will be created in a future iteration of a recipe.
Performance tip: Tables and nicknames that are referred to by random_reference are indexed, which makes them slightly slower to generate than normal. This should seldom be a problem in practice, but if you experience performance problems you could switch to a normal reference to see if that improves things.
Unique random references
random_reference has a unique parameter which ensures that each target row is used only once.
- object: Owner
  count: 10
  fields:
    name:
      fake: Name
- object: Pet
  count: 10
  fields:
    ownedBy:
      random_reference:
        to: Owner
        unique: True
In the case above, the relationship between Owners and Pets will be one-to-one in a random order, rather than a totally random distribution which would tend to have some Owners with multiple pets.
In the case above, it is clear that the scope of the uniqueness should be the Pets, but in the case of join tables, like Salesforce's Campaign Member, this is ambiguous and must be specified like this:
# examples/salesforce/campaign-member.yml
- snowfakery_version: 3
- object: Campaign
  count: 5
  fields:
    Name: Campaign ${{child_index}}
- object: Contact
  count: 3
  fields:
    FirstName:
      fake: FirstName
    LastName:
      fake: LastName
  friends:
    - object: CampaignMember
      count: 5
      fields:
        ContactId:
          reference: Contact
        CampaignId:
          random_reference:
            to: Campaign
            parent: Contact
            unique: True
The parent parameter clarifies that the scope of the uniqueness is the local Contact.
Each of the Contacts will have CampaignMembers that point to unique campaigns, like
this:
Campaign(id=1, Name=Campaign 0)
Campaign(id=2, Name=Campaign 1)
Campaign(id=3, Name=Campaign 2)
Campaign(id=4, Name=Campaign 3)
Campaign(id=5, Name=Campaign 4)
Contact(id=1, FirstName=Catherine, LastName=Hanna)
CampaignMember(id=1, ContactId=Contact(1), CampaignId=Campaign(2))
CampaignMember(id=2, ContactId=Contact(1), CampaignId=Campaign(5))
CampaignMember(id=3, ContactId=Contact(1), CampaignId=Campaign(3))
CampaignMember(id=4, ContactId=Contact(1), CampaignId=Campaign(4))
CampaignMember(id=5, ContactId=Contact(1), CampaignId=Campaign(1))
Contact(id=2, FirstName=Mary, LastName=Valencia)
CampaignMember(id=6, ContactId=Contact(2), CampaignId=Campaign(1))
CampaignMember(id=7, ContactId=Contact(2), CampaignId=Campaign(4))
CampaignMember(id=8, ContactId=Contact(2), CampaignId=Campaign(5))
CampaignMember(id=9, ContactId=Contact(2), CampaignId=Campaign(2))
CampaignMember(id=10, ContactId=Contact(2), CampaignId=Campaign(3))
Contact(id=3, FirstName=Jake, LastName=Mullen)
CampaignMember(id=11, ContactId=Contact(3), CampaignId=Campaign(1))
CampaignMember(id=12, ContactId=Contact(3), CampaignId=Campaign(4))
CampaignMember(id=13, ContactId=Contact(3), CampaignId=Campaign(3))
CampaignMember(id=14, ContactId=Contact(3), CampaignId=Campaign(5))
CampaignMember(id=15, ContactId=Contact(3), CampaignId=Campaign(2))
fake
The fake function generates fake data. This function is defined further in the Fake Data Tutorial
date_between
The date_between function picks a random date in some date range. For example, this recipe picks a date between Y2K and the present day.
- object: OBJ
    fields:
      date:
        date_between:
            start_date: 2000-01-01
            end_date: today
The options start_date and end_date can take these forms, too.
YYYY-MM-DD+<number>d:numberof days in the future, such as+10d-<number>d:numberof days in the past, such as-10d+<number>M:numberof months in the future, such as+10M-<number>M:numberof months in the past, such as-10M+<number>y:numberof years in the future, such as+10y-<number>y:numberof years in the past, such as-10y+<number>w:numberof weeks in the future, such as+10w-<number>w:numberof weeks in the past, such as-10wtoday: The date the template is evaluated
Case is relevant. The "M" for months is uppercase. The rest are lowercase.
Let's pick a date between 30 days ago and 108 days in the future.
Payment_Date:
  date_between:
    start_date: -30d
    end_date: +180d
The date_between function can also be used in formulas.
wedding_date: Our big day is ${{date_between(start_date="2022-01-31", end_date="2022-12-31")}}
datetime_between
datetime_between is similar to date_between but relates to datetimes.
Some example of randomized datetimes:
# tests/test_fake_datetimes.yml
- snowfakery_version: 3
- object: OBJ
  fields:
    past:
      datetime_between:
        start_date: 1999-12-31 # party like its 1999!!
        end_date: today
    future:
      datetime_between:
        start_date: today
        end_date: 2525-01-01 # if man is still alive!!
    y2k:
      datetime_between:
        start_date: 1999-12-31 11:59:00
        end_date: 2000-01-01 01:01:00
    empty:
      datetime_between:
        start_date: 1999-12-31 11:59:00
        end_date: 1999-12-31 11:59:00
    westerly:
      datetime_between:
        start_date: 1999-12-31 11:59:00
        end_date: now
        timezone:
          relativedelta:
            hours: +8
random_number
The random_number function picks a number in a range specified by min and max.
age:
  random_number:
    min: 12
    max: 95
If the number has to be divsible by another number (such as only multiples of 10), supply a step.
age:
  random_number:
    min: 10
    max: 90
    step: 10
As the name step implies, and to be a bit more precise, the output number minus min is a multiple of the step, which generates 12, 17 or 22.
age:
  random_number:
    min: 12
    max: 23
    step: 5
The random_number function can also be used as a function in formulas.
some_number: A number ${{random_number(min=5, max=10)}}
if and when
if lets you make field values conditional on other field values.
when can be a Python formula. It's even interpreted as a boolean similar to how Python does it: the first when clause that matches is selected. The final choice clause in the sequence has no when clause; it's selected if there's no match to the previous choices.
Let's use if and when in a recipe named conditional.yml.
# examples/conditional.yml
- snowfakery_version: 3
- object: Person
  fields:
    gender:
      random_choice:
        Male: 40%
        Female: 40%
        Other: 20%
    name:
      if:
        - choice:
            when: ${{gender=='Male'}}
            pick:
              fake: FirstNameMale

        - choice:
            when: ${{gender=='Female'}}
            pick:
              fake: FirstNameFemale

        - choice:
            pick:
              fake: FirstNameNonBinary
Macros
Macros re-uses groups of fields instead of requiring you to repeat them manually.
Let's use a macro in a recipe named evolution.yml.
- macro: canine
  fields:
    sound: barks
    legs: 4
    family: Caninae

- object: Animal
  include: canine
  fields:
    species: dog
    home: inside

- object: Animal
  include: canine
  fields:
    species: wolf
    home: outside
This recipe generates:
Animal(id=1, sound=barks, legs=4.0, family=Caninae, species=dog, home=inside)
Animal(id=2, sound=barks, legs=4.0, family=Caninae, species=wolf, home=outside)
Let's include more than one group of macros in a recipe named evolution_2.yml.
- macro: canine
  fields:
    sound: barks
    legs: 4
    family: Caninae

- macro: domestic
  fields:
    home: inside
    eats: petfood

- object: Animal
  count: 2
  include: canine, domestic
  fields:
    name: dog
This recipe generates:
Animal(id=1, sound=barks, legs=4.0, family=Caninae, home=inside, eats=petfood, species=dog)
Animal(id=2, sound=barks, legs=4.0, family=Caninae, home=inside, eats=petfood, species=dog)
Macros can include other macros. In fact, macros are especially powerful if you combine them with the include_file feature that lets one file include another. We even suggest you make a library of the most common object types you work with and then override fields to combine or specialize them.
.. note::
fields or friends declared in the macros listed later override those listed earlier. fields or friends declared in the Object Template override those declared in macros.
Debug
You can use Snowfakery's debug function to output values to stderr (usually, the command line) for debugging.
The debug function can "wrap" any formula expression and return its value.
# tests/debug.recipe.yml
- snowfakery_version: 3
- object: Example
  fields:
    value1: ${{ debug(399 + 21) / 10 }}
    value2: ${{ debug((399 + 21) / 10) }}
    value3:
      debug:
        - fake: datetime
In addition to its usual output, this would output:
DEBUG - 420 (<class 'int'>)
DEBUG - 42.0 (<class 'float'>)
DEBUG - 2017-06-19 22:10:13+00:00 (<class 'datetime.datetime'>)
Define Variables
To generate a value shared by multiple templates, create a variable with var.
Let's create a variable named "lastname.yml" that uses a shared var.
- var: lastname_var
  value:
    fake: LastName
- object: person
  fields:
    FirstName:
      fake: FirstName
    LastName: ${{lastname_var}}
- object: spouse
  fields:
    FirstName:
      fake: FirstName
    LastName: ${{lastname_var}}
.. note::
This works both at the top level of your recipe and in friends lists.
To group several fields together, create a "hidden" object.
- var: shared_address
  value:
    - object: __shared_address
      fields:
        street:
          fake: StreetAddress
        city:
          fake: city
        state:
          fake: state
Include Files
The include_file feature pulls in all declarations from the declared file. The file can itself include other files.
To include a file by a relative path:
- include_file: child.yml
Formulas
To insert data from one field into into another, use a formula.
# examples/price_math.recipe.yml
- snowfakery_version: 3
- object: Sale
  fields:
    num_items:
      random_number:
        min: 10
        max: 20
    per_item_price:
      random_number:
        min: 10
        max: 20
    message: Thanks for buying ${{num_items}} items @ $${{per_item_price}} each!
You can also make your data more dynamic with formulas. Formulas even use the same functions described in Function Blocks, but they can also be used inline.
- object: Sale
  count: 2
  fields:
    per_item_price: ${{random_number(20, 50)}}
    number_of_items: 3
    total: ${{per_item_price * number_of_items}}
    message: Thank you for buying $${{total}} items!
Formula Language
Some general principles about formulas:
- Use
${{to start a formula and}}to end it. - Use Python expression syntax in the middle.
- Field values defined earlier on this object are available as names.
- Generate
fakevalues in formulas with dots ("."). For example,Name: ${{fake.FirstName}} Johnson - Parent (or ancestor) values are available through the parent's
objectname, such asOpportunity.amount.
Formulas are based on a similar language called Jinja2, but we use ${{ and }} to be more compatible with YAML.
The relevant section of the Jinja document is called Expressions. It includes information about Literals, Math, Comparisons, Logic, Other Operators, If Expressions and Python Methods.
Formula Functions and Variables
"Filters" allow you to do transformations of strings and numbers like this:
# examples/jinja_filters.recipe.yml
- snowfakery_version: 3
- object: Campaign
  fields:
    Name: ${{fake.bs | title}} Campaign
    UpperCaseName: ${{fake.bs | upper}}
    LowerCaseName: ${{fake.bs | lower}}
The list of filters is in the Jinja documentation.
Formula Functions and Variables
The functions below are designed to be used in formulas.
child_index
The child_index function returns a counter of how many objects from this template were generated during the execution of the nearest parent template. It resets each time the parent template is executed.
child_index: ${{child_index}}
unique_id
The unique_id variable returns a unique number that can
be used to distinguish any record from others. For example,
we can incorporate a unique ID into an email address or
an employee ID.
# examples/unique_id/test_unique_id.yml
- snowfakery_version: 3
- object: Contact
  count: 3
  fields:
    FirstName:
      fake: FirstName
    LastName:
      fake: LastName
    EmployeeNum: ${{unique_id}}
    Email: ${{unique_id}}_${{fake.email}}
By default, Snowfakery works in "small id" mode, which means that IDs start as 6-7 digits, and grow longer as you generate more records.
$ snowfakery examples/unique_id/test_unique_id.yml
Contact(id=1, FirstName=Melody, LastName=Sherman, EmployeeNum=1371010, Email=9782010_cowens@example.org)
Contact(id=2, FirstName=Christian, LastName=Owens, EmployeeNum=2433010, Email=2414010_jimmy21@example.com)
Contact(id=3, FirstName=Tami, LastName=Stevenson, EmployeeNum=6375010, Email=8126010_leah50@example.net)
...
"Big ID" mode allows you to make 22+ digit IDs that are very likely to
be unique across time and space. It is
described more in unique_id and Big IDs.
Snowfakery may change its default mode to Big IDs at some point in the future. Do not assume that your IDs will always be small.
If you do not care about uniqueness, use random_number instead.
If you want the numbers to be generated in
a predictable fashion with no gaps, use
counter instead.
If you want the numbers to have a certain
number of digits, use the UniqueId plugin.
unique_alpha_code
The unique_alpha_code functions generates unique alphanumeric codes similar to those
used in some bureaucracies were space is an issue. Snowfakery alphanumeric codes are
about 11 characters long in small ID mode and about 17 in Big ID mode. The more you use,
the bigger they will grow.
# examples/unique_id/test_unique_alpha_code.yml
- snowfakery_version: 3
- object: Contact
  count: 3
  fields:
    FirstName:
      fake: FirstName
    LastName:
      fake: LastName
    DepartmentCode: ${{unique_alpha_code}}
Contact(id=1, FirstName=Jeremy, LastName=Higgins, DepartmentCode=2AUHHSZN)
Contact(id=2, FirstName=Vicki, LastName=Vazquez, DepartmentCode=GDH9OYLN)
Contact(id=3, FirstName=Gene, LastName=Wall, DepartmentCode=42Q3XX3N)
today
The today variable returns a date
representing the current date. This date
will not chanage during the execution of
a single recipe. See the date function
to learn more about this type of object.
now
The now variable returns a datetime
representing the current moment. It outputs
microsecond precision and is in the UTC timezone.
Using this recipe, you can see three different ways of outputting the timestamp:
# tests/test_now.yml
- snowfakery_version: 3
- object: Times
  fields:
    current_datetime: ${{now}}
    current_datetime_as_number: ${{now.timestamp()}}
    current_datetime_without_microseconds: ${{int(now.timestamp())}}
This would generate field values similar to these:
current_datetime=2022-02-23 15:39:49.513086+00:00, current_datetime_as_number=1645630789.513975, current_datetime_without_microseconds=1645630789
Experimentally, this variable is not guaranteed to return a unique value each time, especially on Windows.
fake: and fake.
The fake: block function and fake. namespace both generate fake data as described in the Fake Data Tutorial.
Let's use fake: and fake. in a recipe named two_fakers.yml.
# examples/two_fakers.yml
- snowfakery_version: 3
- object: Contact
  fields:
    FirstName:
      fake: FirstName
    LastName: ${{fake.LastName}}
snowfakery_filename
The snowfakery_filename variable represents the file that contains the template. This is useful for relative paths.
date
The date function can coerce a string into a date object for calculations, or generate a new date object from year/month/day designations. For example:
the_date: ${{date("2018-10-30")}}
another_date: ${{date(year=2018, month=11, day=30)}}
These objects have the following attributes:
- date.year: the year
- date.month: between 1 and 12 inclusive.
- date.day: between 1 and the number of days in the given month of the given year.
And these methods:
- date.weekday(): the day of the week as an integer, where Monday is 0 and Sunday is 6. For example, date(2002, 12, 4).weekday() == 2, a Wednesday.
- date.isoformat() - string representing the date in ISO 8601 format, YYYY-MM-DD
- strftime(format) - create a string representing the time under the control of an explicit format string.
datetime
The datetime function can generate
a new datetime object from year/month/day parts, from a string
or from a date object.
A datetime combines both a date and a time into a single value. E.g. 11:03:21 on February 14, 2024. We can express that datetime as
2024-02-14 11:03:21
Datetimes default to using the UTC time-zone, but you can control that by
adding a timezone after a plus sign: 2008-04-25 21:18:29+08:00
# tests/test_datetime.yml
- snowfakery_version: 3
- object: Datetimes
  fields:
    from_date_fields: ${{datetime(year=2000, month=1, day=1)}}
    from_datetime_fields: ${{datetime(year=2000, month=1, day=1, hour=1, minute=1, second=1)}}
    some_date: # a date, not a datetime, for conversion later
      date_between:
        start_date: today
        end_date: +1y
    from_date: ${{datetime(some_date)}}
    from_string: ${{datetime("2000-01-01 01:01:01")}}
    from_yaml:
      datetime: 2000-01-01 01:01:01
    right_now: ${{now}}
    also_right_now: ${{datetime()}}
    also_also_right_now:
      datetime: now
    hour: ${{now.hour}}
    minute: ${{now.minute}}
    second: ${{now.second}}
    right_now_with_timezone: ${{now.astimezone()}}
    to_date: ${{now.date()}}
These objects have the following attributes:
- datetime.year: the year
- datetime.month: between 1 and 12 inclusive.
- datetime.day: between 1 and the number of days in the given month of the given year.
- datetime.hour: the hour
- datetime.minute: the minute
- datetime.second: the second
And these methods:
- date.weekday(): the day of the week as an integer, where Monday is 0 and Sunday is 6. For example, date(2002, 12, 4).weekday() == 2, a Wednesday.
- date.isoformat() - string representing the date in ISO 8601 format, YYYY-MM-DD
- strftime(format) - create a string representing the time under the control of an explicit format string.
- astimezone() - create a timezone-aware datetime for your current timezone
- date() - convert a datetime into a date.
relativedelta
The relativedelta function from dateutil is available for use in calculations. For example:
${{ date(Date_Established__c) + relativedelta(months=) }}
Some plugins are also interested in a template variable that has an id attribute that represents a unique identifier for the current template. Look at
datasets.py to see one use-case where the template's ID can used to differentiate between two otherwise identical datasets.
NULL
The NULL value represents a missing value.
Let's use this value in a recipe named nullvalue.yml.
- object: foo
  count: 10
  fields:
    EndDate:
      random_choice:
        - date_between:
            start_date: 2018-01-01
            end_date: 2021-12-12
        - NULL
    DateSupplied:
      if:
        - choice:
            when: ${{ EndDate!=NULL }}
            pick: "Yes"
        - choice:
            pick: "No"
In this example, NULL becomes a random_choice option in the EndDate field. Then in the DateSupplied field, you test if the value is NULL or not.
Command Line Interface
Use the command line interface to learn the list of options available in the latest version of Snowfakery.
Usage: snowfakery [OPTIONS] YAML_FILE

      Generates records from a YAML file

      Records can go to:
          * stdout (default)
          * JSON file (--output-format=json --output-file=foo.json)
          * diagram file (--output-format=png --output-file=foo.png)
          * a database identified by --dburl (such as --dburl sqlite:////tmp/foo.db)
          * or to a directory as a set of CSV files (--output-format=csv --output-folder=csvfiles)

      Diagram output depends on the installation of graphviz
      (https://www.graphviz.org/download/)

      Full documentation here:

          * https://snowfakery.readthedocs.io/en/docs/

Options:
  --dburl TEXT                    URL for database to save data to. Use
                                  sqlite:///foo.db if you don't have one set
                                  up.

  --output-format [png|svg|svgz|jpeg|jpg|ps|dot|json|txt|csv|sql]
  --output-folder PATH
  -o, --output-file PATH
  --option EVAL_ARG...            Option to send to the recipe YAML in a
                                  format like 'OptName OptValue'. Specify
                                  multiple times if needed.

  --target-number, --target-count TEXT...
                                  Target record count for the recipe YAML in
                                  the form of 'number tablename'. For example:
                                  '50 Account' to generate roughly 50
                                  accounts.

  --reps INTEGER                  Target repetition count for the recipe YAML.
                                  Use as an alternative to --target-number

  --debug-internals / --no-debug-internals
  --generate-cci-mapping-file FILENAME
                                  Generate a CumulusCI mapping file for the
                                  dataset

  --generate-continuation-file FILENAME
                                  A file that captures information about how
                                  to continue a multi-batch data generation
                                  process

  --continuation-file FILENAME    Continue generating a dataset where
                                  'continuation-file' left off

  --plugin-option EVAL_ARG...     Option to send to a plugin in a format like
                                  'OptName OptValue'. Specify multiple times
                                  if needed.

  --load-declarations FILE        Declarations to mix into the generated
                                  mapping file

  --version                       Show the version and exit.
  --help                          Show this message and exit.
Scale Up Recipe Execution
From the command line you can control how many rows a recipe generates.
The simplest method:
snowfakery accounts.yml --reps 1000
This runs the recipe 1000 times. Easy!
But let's say you want to run a test against 50,000 accounts. You can calculate out how many reps to run in the command line, but this can be complex because Snowfakery recipes can also generate a random number of accounts in each run. Even for simple recipes, doing the math can be a headache, especially if you frequently make edits to the recipe.
A better solution is to specify the target-number and target tablename. For example:
snowfakery accounts.yml --target-number 1000 Account
The count works like this:
- Snowfakery always executes a complete recipe. It never stops halfway through.
- At the end of recipe execution, Snowfakery checks if it created enough of the object type defined by
target-number. - If so, Snowfakery finishes the recipe. If not, it runs the recipe again.
If your recipe creates 10 Accounts, 5 Contacts and 15 Opportunities, and the previous command runs the recipe 100 times (1000/10=100), it generates 1000 Accounts, 500 Contacts, and 1500 Opportunites.
CSV Output
To create a CSV directory:
$ snowfakery template.yml --output-format csv --output-folder csvfiles
...
This generates a directory that looks like:
Animal.csv
Person.csv
PetFood.csv
csvw_metadata.json
.. note::
If you do not specify an output-folder, the files are created in the current folder.
The CSVW JSON file is a sort of manifest for all of the CSV files.
Advanced Features
Singletons with the just_once Feature
Snowfakery scales up to larger data volumes by evaluating your recipe over and over again. Each evaluation is called an iteration.
Some objects are meant to be produced only once, regardless of how many times the recipe executes. The programming language term for this is a "singleton". For example, an accounting system generates a dataset that has exactly two Ledger objects, Checking and Savings. You can have dozens of Entries per Ledger, or even billions. But the recipe only generates two Ledger rows.
Let's generate two--and only two!--Ledger rows with the just_once function in a recipe named twoledgers.yml.
- object: Ledger
  just_once: True
  nickname: Checking
  fields:
    Name: Checking

- object: Ledger
  just_once: True
  nickname: Savings
  fields:
    Name: Savings

- object: Entry
  count: 1000
  fields:
    Ledger: Checking
    ...

- object: Entry
  count: 1000
  fields:
    Ledger: Savings
    ...
To execute this recipe from the Snowfakery command line:
$ snowfakery accounting.yml --target-number 10_000 Entry
...
This recipe creates two Ledger rows, and 5000 Entry rows attached to each of the Ledger rows. If you scale up the recipe to one million, you still have only two Ledger rows.
Hidden Fields and Objects
As described earlier, fields can refer to each other. For example, field c can be the sum of fields a and b. Or perhaps you only want to output PersonLastName if PersonFirstName was set, and PersonFirstName is set randomly.
To create a value that gets used in computations but does not become output in the final database or CSV, create a field value prefixed by two underscores.
You can even do this with Object Templates to generate "objects" that are never saved as rows to your database, Salesforce org, or output file.
Let's hide several fields and objects in a recipe named hidden_fields.yml.
- object: Dates
  fields:
    __total_months: 48
    __first_month: ${{today - relativedelta(months=__total_months)}}
    __end_of_first_quarter: ${{date(__first_month) + relativedelta(months=3)}}
    ProgramStartDate: ${{__first_month}}
    FirstEvent:
      date_between:
        start_date: ${{__first_month}}
        end_date: ${{__end_of_first_quarter}}
    ProgramEndDate: ${{date(__first_month) + relativedelta(months=12)}}
This generates:
Dates(id=1, ProgramStartDate=2016-11-30, FirstEvent=2017-02-24, ProgramEndDate=2017-11-30)
Random Weights that are Not Percentages
Consider this field definition.
StageName:
  random_choice:
    Closed Won: 5
    In Progress: 3
    New: 4
Observant readers note that the values do not add up to 100. That's fine. Closed Won is selected 5/12 of the time, In Progress is selected 3/12, and New is selected 4/12 of the time. They are just weights, not necessarily percentage weights.
Many to One Relationships
In relational databases, child records typically have a reference to their parent record, but the opposite is not true.
Let's examine the relationships featured in the recipe named company.yml. You see that the Company object (row) relates to many Employee objects (rows).
# examples/company.yml
- snowfakery_version: 3
- object: Company
  fields:
    Name:
      fake: company

- object: Employee
  nickname: Employee 1
  fields:
    Name:
      fake: name
    EmployedBy:
      - object: Company

- object: Employee
  nickname: Employee 1
  fields:
    Name:
      fake: name
    EmployedBy:
      - object: Company
This generates:
Company(id=1, Name=Nelson-Sampson)
Company(id=2)
Employee(id=1, Name=Julie Turner, EmployedBy=Company(2))
Company(id=3)
Employee(id=2, Name=Amanda Martin, EmployedBy=Company(3))
Now let's say you generate 10 companies with 100 employees per company. It's easy with Snowfakery's friends or hidden field feature.
Let's use the friends feature in a recipe named company2.yml.
# examples/company2.yml
- snowfakery_version: 3
- object: Company
  count: 10
  fields:
    Name:
      fake: company
  friends:
    - object: Employee
      count: 100
      nickname: Employee 1
      fields:
        Name:
          fake: name
        EmployedBy:
          reference: Company
And let's use the hidden fields([#hidden-fields-and-objects]) feature in a recipe named company3.yml.
# examples/company3.yml
- snowfakery_version: 3
- object: Company
  count: 10
  fields:
    Name:
      fake: company
    __employees:
      - object: Employee
        count: 100
        nickname: Employee 1
        fields:
          Name:
            fake: name
          EmployedBy:
            reference: Company
Advanced Unique ID Generators
Snowfakery has two built-in functions for generating UniqueIDs plus the more advanced
objects described below. The simple functions are unique_id and
unique_alpha_code. More advanced generators ID generators
can also be created.
unique_id and Big IDs
Snowfakery's default mode for ID generation is "Small ID" mode, wherein IDs start out as single-digit numbers and grow over time.
"Big ID" mode allows you to make IDs that are very likely to be unique across time and space. Specifically: it incorporates a timestamp, information about the current process and about 8 bits of randomness. The generated IDs are about 22 digits long. Unless you are running Snowfakery on thousands of computers at the exact same time, the chances of a clash are miniscule, and in any case, a clash only matters if the unique IDs are destined to end up in a common Salesforce Org or database.
CumulusCI manages Big ID mode for you automatically.
If you are using Snowfakery outside of CumulusCI, you can turn on Big ID mode from the command line:
$ snowfakery examples/test_unique_id.yml --plugin-option big_ids True
Contact(id=1, FirstName=Stephen, LastName=Parrish, Employee=763534209134265915391, Email=763534209134265915392_brittany17@example.org)
If you do need even higher levels of uniqueness, you can
inject "unique execution ids" from some external source through the
plugin option pid. Those execution
ids would replace the timestamp and process information in your Big ID's calculation.
 $ snowfakery examples/test_unique_id.yml --plugin-option big_ids True --plugin-option pid 111
Contact(id=1, FirstName=Melody, LastName=Marquez, Employee=157937691, Email=157937692_emmahoover@example.org)
The 111 value is not literally included in the ID, but it is an input into
the unique ID generation algorithm. As an example, you can inject
about 15 digits of randomness and a timestamp like this on Unix-ish systems:
snowfakery examples/test_unique_id.yml --plugin-option big_ids True --plugin-option pid `date +"%s"`$RANDOM$RANDOM$RANDOM
Contact(id=1, FirstName=Cheryl, LastName=Estes, Employee=11014765223046647500920591, Email=11014765223046647500920592_solisroy@example.org)
If you pause and resume Snowfakery recipe generation using the continuation
file feature, indexes will restart, so you should inject an external unique
context ID through pid as shown above or through the API.
Counters
Snowfakery has a plugin called Counters which can generate
numeric counters (1,2,3,4 or 3,6,9,12) and date counters
(2021-01-01, 2021-01-02, 2021-01-03).
Counters are reset
every iteration of the recipe.
Counters are reset at the beginning of every "iteration". This makes them
inappropriate for generating unique identifiers. Use unique_id
instead.
Numeric Counters
Snowfakery can generate incrementing numbers like this:
# examples/counters/number_counter.recipe.yml
- snowfakery_version: 3
- plugin: snowfakery.standard_plugins.Counters
- object: Example
  count: 10
  fields:
    count:
      Counters.NumberCounter:
        start: 1
        name: foo
This would output:
$ snowfakery examples/counters/number_counter.recipe.yml
Example(id=1, count=1)
Example(id=2, count=2)
Example(id=3, count=3)
Example(id=4, count=4)
Example(id=5, count=5)
Example(id=6, count=6)
Example(id=7, count=7)
Example(id=8, count=8)
Example(id=9, count=9)
Example(id=10, count=10)
You can also control the start position and "step" like this:
# examples/counters/counter_start.recipe.yml
- snowfakery_version: 3
- plugin: snowfakery.standard_plugins.Counters
- object: Example
  count: 10
  fields:
    count:
      Counters.NumberCounter:
        start: 11
        step: 3
This generates:
Example(id=1, count=11)
Example(id=2, count=14)
Example(id=3, count=17)
Example(id=4, count=20)
Example(id=5, count=23)
Example(id=6, count=26)
Example(id=7, count=29)
Example(id=8, count=32)
Example(id=9, count=35)
Example(id=10, count=38)
As described above, counters are reset each iteration, as described above:
snowfakery examples/counters/number_counter.recipe.yml --reps 2
Example(id=1, count=1)
Example(id=2, count=2)
Example(id=3, count=3)
Example(id=4, count=4)
Example(id=5, count=5)
Example(id=6, count=6)
Example(id=7, count=7)
Example(id=8, count=8)
Example(id=9, count=9)
Example(id=10, count=10)
Example(id=11, count=1)
Example(id=12, count=2)
Example(id=13, count=3)
Example(id=14, count=4)
Example(id=15, count=5)
Example(id=16, count=6)
Example(id=17, count=7)
Example(id=18, count=8)
Example(id=19, count=9)
Example(id=20, count=10)
Recipe Options
Instead of manually entering the exact number of records to create into a template file, pass an option (such as numbers, strings, booleans, and so on) to your generator recipe from the command line.
First, declare the option in your template file. For example:
- option: num_accounts
  default: 10
.. note::
If you do not specify a default, the option itself becomes mandatory, and the template is not processed without it.
To use an option value by referring to it in a formula:
- object: Account
  count: ${{num_accounts}}
Of course, you can do any math you want in the formula...
- object: Account
  count: ${{num_accounts / 2}}
    field:
        type: A
- object: Account
  count: ${{num_accounts / 2}}
    field:
        type: B
...Then pass that option.
--option numaccounts 10
Use Snowfakery in Python
You can embed Snowfakery in a Python application.
from snowfakery import generate_data

generate_data(
    yaml_file="examples/company.yml",
    option=[("A", "B")],
    target_number=(20, "Employee"),
    debug_internals=True,
    output_format="json",
    output_file=outfile,
)
To learn more about using Snowfakery in Python, see Embedding Snowfakery into Python Applications
Use Snowfakery with Databases
Snowfakery is built on top of a very flexible engine called SQLAlchemy. This engine lets it connect to many different databases subject to the limitations described in this section.
First, install Snowfakery in a context that makes it easy to use the Python command pip to manage your Python environment. For example, you can install Python
using the standard installers from python.org, and then run these commands to create and use a venv with the Postgres package.
# create a new directory for our experiment
$ mkdir experiment_with_postgres
# cd into it
$ cd experiment_with_postgres
# create a new database:
# https://www.postgresql.org/docs/9.1/app-createdb.html
$ createdb snowfakerydb
# create a virtual environment. A good habit to get into.
# https://docs.python.org/3/library/venv.html
$ python3 -m venv myvenv
# activate the venv
$ source myvenv/bin/activate
# install Snowfakery in this venv
$ pip install snowfakery
# install the Postgres library for Python
# https://pypi.org/project/psycopg2/
$ pip install psycopg2
# let's use it!
$ snowfakery --dburl='postgresql://localhost:5432/snowfakerydb' examples/company.yml --target-number 1000 Employee
# and check the results
# https://www.postgresql.org/docs/9.3/app-psql.html
$ echo 'select * from "Employee"' | psql snowfakerydb
You can determine the database strings and drivers to install from the SQLAlchemy docs:
The SQLite driver is built-in and can be used with a --dburl
like sqlite:////tmp/foo.db.
A limitation of this process is that Snowfakery currently can only create new tables rather than import into existing ones. The table has an id column in addition to columns for every field that was generated by the recipe. All columns are type text.
The list of databases supported by our underlying infrastructure (SQLAlchemy) is listed here and here.
Snowfakery is not proactively tested with every output database. We encourage you to keep in touch with the Snowfakery team about your experience of using Snowfakery with your databases. It gives us a better sense of what works well and what does not. We also appreciate any bug reports and pull requests related to problems you discover along the way.
Plugins and Providers
Plugins and providers extend Snowfakery with Python code. A plugin adds new functions to Snowfakery. A provider adds new capabilities to the Faker library, which is exposed to Snowfakery users through the fake: keyword.
To include plugins or providers in a Snowfakery file:
- plugin: package.module.classname
Built-in Plugins
Advanced Math
Snowfakery has a Math plugin that offers access to all features from Python's math, min, max, and round.
For example:
- plugin: snowfakery.standard_plugins.Math
- object: OBJ
  fields:
    twelve:
      Math.sqrt: ${{Math.min(144, 169)}}
Or:
- plugin: snowfakery.standard_plugins.Math
- object: OBJ
  fields:
    twelve: ${Math.sqrt}
Advanced Unique IDs with the UniqueId plugin
There is a plugin which gives you more control over the generation of Unique IDs and Alphanumeric Codes.
Unique ID Alphabets
One of the features of the UniqueId plugin is controlling the alphabet used for generating alphanumeric codes. One could make the alphabet bigger or smaller as below:
# examples/unique_id/alphabet.recipe.yml
- snowfakery_version: 3
- plugin: snowfakery.standard_plugins.UniqueId
- var: LargeAlphabetGenerator
  value:
    UniqueId.AlphaCodeGenerator:
      alphabet: 0123456789ABCDEFGHIJKLMNOPQRSTUVWXYZabcdefghijklmnopqrstuvwxyz
- var: DNAGenerator
  value:
    UniqueId.AlphaCodeGenerator:
      alphabet: ACGT
- var: NumberGenerator
  value:
    UniqueId.AlphaCodeGenerator:
      alphabet: 0123456789

- object: DemonstrateAlphabets
  count: 5
  fields:
    big_alpha_example: ${{LargeAlphabetGenerator.unique_id}}
    dna_example: ${{DNAGenerator.unique_id}}
    num_example: ${{NumberGenerator.unique_id}}
This would generate:
DemonstrateAlphabets(id=1, big_alpha_example=2r0NXGiBY, dna_example=GACGCCCTACCA, num_example=6843813157)
DemonstrateAlphabets(id=2, big_alpha_example=4LTepQ9TE, dna_example=TGTGTTTTTATGA, num_example=56465396322)
DemonstrateAlphabets(id=3, big_alpha_example=2yRu7l5Rk, dna_example=TGTCTGGTCTTA, num_example=22377438298)
DemonstrateAlphabets(id=4, big_alpha_example=1WCE6hDIO, dna_example=TGGTTTGTTAGA, num_example=22299878992)
DemonstrateAlphabets(id=5, big_alpha_example=1I25wfsXE, dna_example=GCGTGTCGTATTA, num_example=39979614438)
Code length
You can control the minimum (but not the maximum) length of a unique code:
# examples/unique_id/min_length.recipe.yml
- snowfakery_version: 3
- plugin: snowfakery.standard_plugins.UniqueId
- var: MySmallCodeGenerator
  value:
    UniqueId.AlphaCodeGenerator:
      min_chars: 6
- object: Example
  count: 10
  fields:
    unique: ${{MySmallCodeGenerator.unique_id}}
The code will grow over time as a consequence of keeping every value unique.
External datasets
Snowfakery can incorporate data from external CSV files or databases as datasets.
Iterate Over CSV Datasets
Here's an example of a simple CSV-based dataset named addresses.csv. Note that the column names come from the first row.
Number,Street,City,Postcode
420,Kings Ave,Burnaby,85633
421,Granville Street,White Rock,85633
422,Kingsway Road,Richmond,85633
To iterate over this data with Snowfakery:
- plugin: snowfakery.standard_plugins.datasets.Dataset
- object: Person
  count: 10
  fields:
    Name:
      fake: name

    __address_from_csv:
      Dataset.iterate:
        dataset: addresses.csv
    StreetAddress: ${{__address_from_csv.Number}} ${{__address_from_csv.Street}}
    City: ${{__address_from_csv.City}}
examples/datasets/datasets.recipe.yml
The plugin only needs to be declared once per recipe.
The double-underscore ("dunder") syntax is described in [#hidden-fields-and-objects]. In this context, it grabs an entire CSV row and gives it a name so that specific columns can later be called by that name.
The Dataset.iterate function block pulls each row from the dataset in order, one for each Person. It returns to the top after it has used every row.
Let's look at what this dataset (randomly) generates.
$ snowfakery examples/datasets/datasets.recipe.yml
Person(id=1, Name=Dawn Gray, StreetAddress=420 Kings Ave, City=Burnaby)
Person(id=2, Name=Melissa Walker, StreetAddress=421 Granville Street, City=White Rock)
Person(id=3, Name=Roberto Simon, StreetAddress=422 Kingsway Road, City=Richmond)
Person(id=4, Name=Miss Jessica Ramsey, StreetAddress=420 Kings Ave, City=Burnaby)
Person(id=5, Name=Bobby Sutton, StreetAddress=421 Granville Street, City=White Rock)
Person(id=6, Name=Tiffany Cox, StreetAddress=422 Kingsway Road, City=Richmond)
Person(id=7, Name=Ethan Potts, StreetAddress=420 Kings Ave, City=Burnaby)
Person(id=8, Name=Tamara Farley, StreetAddress=421 Granville Street, City=White Rock)
Person(id=9, Name=Austin Wong, StreetAddress=422 Kingsway Road, City=Richmond)
Person(id=10, Name=Kelly Jones, StreetAddress=420 Kings Ave, City=Burnaby)
You can use this feature to create "enriched" data by combining real or pre-generated data in a CSV file with fake data from Snowfakery.
You can execute a template exactly once for every line in a
CSV file (or database table, or Salesforce Query) using the
for_each keyword:
# examples/datasets/simple_for_each.yml
- snowfakery_version: 3
- plugin: snowfakery.standard_plugins.datasets.Dataset

- object: Person
  for_each:
    var: current_address
    value:
      Dataset.iterate:
        dataset: addresses.csv
  fields:
    FirstName:
      fake: FirstName
    LastName:
      fake: LastName
    StreetAddress: ${{current_address.Number}} ${{current_address.Street}}
    City: ${{current_address.City}}
This binds a new row from the CSV to the variable named current_address
over and over, expanding the template for each row. The for_each replaces
the count in a template that uses it.
Iterate over Salesforce Datasets
CumulusCI can be used to download CSV data for enrichment.
Let's download CSV data in a recipe named CumulusCI.yml.
contacts_for_accounts:
  steps:
    1:
      task: query
      options:
        object: Account
        query: select Id from Account
        result_file: accounts.csv
    2:
      task: generate_and_load_from_yaml
      options:
        generator_yaml: examples/salesforce/ContactsForAccounts.recipe.yml
        num_records: 100
        num_records_tablename: Contact
As you can see, CumulusCI.yml uses the generate_and_load_from_yaml task to parse data from the recipe named ContactsForAccounts.recipe.yml.
- plugin: snowfakery.standard_plugins.datasets.Dataset
- object: Contact
  fields:
    __accounts:
      Dataset.shuffle:
        dataset: ../../accounts.csv
    FirstName:
      fake: FirstName
    LastName:
      fake: LastName
    AccountId: ${{__accounts.Id}}
Of course, adjust the paths based on your directory structure.
It's a matter of time until Snowfakery has built-in features to query SOQL, so we recommend that you evaluate those features as an alternative to this technique.
Iterate over SQL Database Datasets
If the reference to a dataset is a URL, Snowfakery attempts to use it as a reference to a database. Snowfakery supports sqlite:/// urls as described in the documentation for SQL Alchemy.
That looks exactly like above except for this line.
dataset: sqlite:///addresses.db
Depending on the context, other database URLs work as well if the context has appropriate drivers installed. Only SQLite is part of our test suite, however.
If a SQL dataset has more than one table, specify what table to use. For example:
__address_from_csv:
  Dataset.iterate:
    dataset: addresses.csv
    table: addresses
Shuffle Data
If you prefer the rows be pulled out in random order, you have two options. The simplest thing is to shuffle it in your Snowfakery recipe.
__address_from_csv:
  Dataset.shuffle:
    dataset: addresses.csv
If you experience performance or memory usage problems with big datasets, your next option is to shuffle the data into a random order before using it in Snowfakery. Snowfakery's source repository includes a simplistic tool called shufflecsv.py that shuffles data for CSV files. You feed it a CSV file on stdin, and it generates another CSV file on stdout.
To shuffle data with shufflecsv.py in the command line:
$ python tools/shufflecsv.py < examples/datasets/addresses.csv > examples/datasets/shuffled.csv
...
.. note:: This script does not currently support CSVs that include newlines within fields.
To shuffle for SQLite or another database, write a script that uses the clause order by random(). This is also how Snowfakery does its randomization internally, so there's not much incentive to only run the Snowfakery recipe once. However, it can save you time if you run the Snowfakery recipe over and over because the shuffling happens once.
Read Files
To read and include Unicode files:
- plugin: snowfakery.standard_plugins.file.File

- object: TextData
  fields:
    encoded_data:
      - File.file_data:
          encoding: utf-8
          file: ../CODE_OF_CONDUCT.md
utf-8 is the default encoding, so you don't actually need to declare it here. That said, other popular text encodings include ascii, big5, latin-1 and shift_jis. There's even more encodings featured on the 100 encodings list.
To read and include Binary files:
- plugin: snowfakery.standard_plugins.base64.Base64
- plugin: snowfakery.standard_plugins.file.File

- object: BinaryData
  fields:
    encoded_data:
      Base64.encode:
        - File.file_data:
            encoding: binary
            file: salesforce/example.pdf
Other encodings of binary data are not currently supported, and output streams generally don't support raw binary data being written to them. It is relatively easy to make a plugin that does other encodings by building on the code in File.py.
Custom Plugins and Providers
Snowfakery can be extended with custom plugins and fake data providers as described in Extending Snowfakery with Python Code.
Update mode
Snowfakery has a special mode that lets you loop over every row of an input, update it, and then output the result with minimal recipe code. For example, if you have a CSV of contacts, and you want to add an address for every one, you do it like this:
# examples/updates/update_contacts.recipe.yml
- snowfakery_version: 3
- object: Contact
  fields:
    FirstName:
      fake: FirstName
    LastName:
      fake: LastName
    BillingStreet: ${{input.Number}} ${{input.Street}}
    BillingCity: ${{input.City}}
    BillingState: Texas
    BillingPostalCode: ${{input.Postcode}}
    BillingCountry: US
Given an input file like this:
Number,Street,City,Postcode
420,Kings Ave,Burnaby,85633
421,Granville Street,White Rock,85633
422,Kingsway Road,Richmond,85633
You can run:
$ snowfakery examples/updates/update_contacts.recipe.yml --update-input-file examples/datasets/addresses.csv --output-format csv
This generates output like this:
FirstName,LastName,BillingStreet,BillingCity,BillingState,BillingPostalCode,BillingCountry,id
Tommy,Nash,420 Kings Ave,Burnaby,Texas,85633,US
Lindsey,Callahan,421 Granville Street,White Rock,Texas,85633,US
Greg,Sellers,422 Kingsway Road,Richmond,Texas,85633,US
An update recipe should have a single top-level object with no count on it.
The recipe can take options if needed. It will generate the same number of
output rows as input rows.
To do updates in a Salesforce org, refer to the CumulusCI documentation.
Faking Scheduled Events
Snowfakery can generate recurring events such as meetings or appointments.
A simple example is scheduling the next ten Halloween Days:
# examples/schedule/halloween.recipe.yml
- snowfakery_version: 3
- plugin: snowfakery.standard_plugins.Schedule
- object: ScaryEvent
  count: 5
  fields:
    Name: Halloween
    Date:
      Schedule.Event:
        start_date: 2023-10-31
        freq: yearly
This will generate date values like this:
# examples/schedule/halloween.recipe.out
ScaryEvent(id=1, Name=Halloween, Date=2023-10-31)
ScaryEvent(id=2, Name=Halloween, Date=2024-10-31)
ScaryEvent(id=3, Name=Halloween, Date=2025-10-31)
ScaryEvent(id=4, Name=Halloween, Date=2026-10-31)
ScaryEvent(id=5, Name=Halloween, Date=2027-10-31)
Scheduled events are always output in chronological order.
Datetime schedules
By supplying a more precise start_date, we can generate
datetime values instead:
# examples/schedule/haunting.recipe.yml
- snowfakery_version: 3
- plugin: snowfakery.standard_plugins.Schedule
- object: ScaryEvent
  count: 5
  fields:
    Name: Halloween
    DateTime:
      Schedule.Event:
        start_date: 2023-10-31 23:59:59.99
        freq: yearly
Outputs:
# examples/schedule/haunting.recipe.out
ScaryEvent(id=1, Name=Halloween, DateTime=2023-10-31T23:59:59+00:00)
ScaryEvent(id=2, Name=Halloween, DateTime=2024-10-31T23:59:59+00:00)
ScaryEvent(id=3, Name=Halloween, DateTime=2025-10-31T23:59:59+00:00)
ScaryEvent(id=4, Name=Halloween, DateTime=2026-10-31T23:59:59+00:00)
ScaryEvent(id=5, Name=Halloween, DateTime=2027-10-31T23:59:59+00:00)
The +00:00 at the end of each one indicates that it is in the UTC
timezone, but you can generate values in other timezones by changing
the timezone of the start_date:
# examples/schedule/with_timezone.recipe.yml
- snowfakery_version: 3
- plugin: snowfakery.standard_plugins.Schedule
- object: ScaryEvent
  count: 5
  fields:
    Name: Halloween
    DateTime:
      Schedule.Event:
        start_date: 2023-10-31 23:59:59.99+08:00
        freq: yearly
# examples/schedule/with_timezone.recipe.out
ScaryEvent(id=1, Name=Halloween, DateTime=2023-10-31T23:59:59+08:00)
ScaryEvent(id=2, Name=Halloween, DateTime=2024-10-31T23:59:59+08:00)
ScaryEvent(id=3, Name=Halloween, DateTime=2025-10-31T23:59:59+08:00)
ScaryEvent(id=4, Name=Halloween, DateTime=2026-10-31T23:59:59+08:00)
ScaryEvent(id=5, Name=Halloween, DateTime=2027-10-31T23:59:59+08:00)
The +08:00 means 8 hours behind UTC.
We can also generate schedules with precision of hours, minutes or seconds by
supplying frequencies of hourly, minutely or daily.
For exaample:
# examples/schedule/secondly.recipe.yml
- snowfakery_version: 3
- plugin: snowfakery.standard_plugins.Schedule
- object: Seconds
  count: 5
  fields:
    DateTime:
      Schedule.Event:
        start_date: 2023-10-31 10:10:58
        freq: secondly
Which generates:
# examples/schedule/secondly.recipe.out
Seconds(id=1, DateTime=2023-10-31T10:10:58+00:00)
Seconds(id=2, DateTime=2023-10-31T10:10:59+00:00)
Seconds(id=3, DateTime=2023-10-31T10:11:00+00:00)
Seconds(id=4, DateTime=2023-10-31T10:11:01+00:00)
Seconds(id=5, DateTime=2023-10-31T10:11:02+00:00)
Days of the week
One can use the strings "MO", "TU", "WE", "TH", "FR", "SA", "SU" with the byweekday
parameter to achieve day-of-week schedules like Monday/Wednesday/Friday.
# examples/schedule/monday_wednesday_friday.recipe.yml
- snowfakery_version: 3
- plugin: snowfakery.standard_plugins.Schedule
- object: Meeting
  count: 5
  fields:
    Name: MWF Meeting
    Date:
      Schedule.Event:
        start_date: 2023-01-01
        freq: weekly
        byweekday: MO, WE, FR
Which outputs:
# examples/schedule/monday_wednesday_friday.recipe.out
Meeting(id=1, Name=MWF Meeting, Date=2023-01-02)
Meeting(id=2, Name=MWF Meeting, Date=2023-01-04)
Meeting(id=3, Name=MWF Meeting, Date=2023-01-06)
Meeting(id=4, Name=MWF Meeting, Date=2023-01-09)
Meeting(id=5, Name=MWF Meeting, Date=2023-01-11)
byweekday has another useful feature. We can use it with a month or
year frequency to get the first, second, third, last, etc. instance of
a date in that period.
# examples/schedule/monday_wednesday_friday_monthly.recipe.yml
- snowfakery_version: 3
- plugin: snowfakery.standard_plugins.Schedule
- object: Meeting
  count: 10
  fields:
    Name: MWF Meeting
    Date:
      Schedule.Event:
        start_date: 2023-01-01
        freq: monthly
        byweekday: MO(+1), WE(-1), FR(+2)
Note the use of -1 to mean "last occurrence". -2 would be second last
and so forth.
Which results in
# examples/schedule/monday_wednesday_friday_monthly.recipe.out
Meeting(id=1, Name=MWF Meeting, Date=2023-01-02)
Meeting(id=2, Name=MWF Meeting, Date=2023-01-13)
Meeting(id=3, Name=MWF Meeting, Date=2023-01-25)
Meeting(id=4, Name=MWF Meeting, Date=2023-02-06)
Meeting(id=5, Name=MWF Meeting, Date=2023-02-10)
Meeting(id=6, Name=MWF Meeting, Date=2023-02-22)
Meeting(id=7, Name=MWF Meeting, Date=2023-03-06)
Meeting(id=8, Name=MWF Meeting, Date=2023-03-10)
Meeting(id=9, Name=MWF Meeting, Date=2023-03-29)
Meeting(id=10, Name=MWF Meeting, Date=2023-04-03)
It makes three dates per month, representing the first Monday, the second Friday and the last Wednesday. The dates are still in chronological order, so the Wednesday comes last.
bymonthday
The bymonthday feature allows one to generate events matching a particular
(numerical) day of the month. For example, the first (bymonthday=1),
third (bymonthday=3), last (bymonthday=-1), second last (bymonthday=-2)
etc.
# examples/schedule/bymonthday.recipe.yml
- snowfakery_version: 3
- plugin: snowfakery.standard_plugins.Schedule
- object: ThirdDayOfMonth
  count: 5
  fields:
    DateTime:
      Schedule.Event:
        start_date: 2024-01-01
        freq: monthly
        bymonthday: 3

- object: FirstAndLastDayOfMonth
  count: 5
  fields:
    DateTime:
      Schedule.Event:
        start_date: 2024-01-01
        freq: monthly
        bymonthday: 1,-1
This generates:
# examples/schedule/bymonthday.recipe.out
ThirdDayOfMonth(id=1, DateTime=2024-01-03)
ThirdDayOfMonth(id=2, DateTime=2024-02-03)
ThirdDayOfMonth(id=3, DateTime=2024-03-03)
ThirdDayOfMonth(id=4, DateTime=2024-04-03)
ThirdDayOfMonth(id=5, DateTime=2024-05-03)
FirstAndLastDayOfMonth(id=1, DateTime=2024-01-01)
FirstAndLastDayOfMonth(id=2, DateTime=2024-01-31)
FirstAndLastDayOfMonth(id=3, DateTime=2024-02-01)
FirstAndLastDayOfMonth(id=4, DateTime=2024-02-29)
FirstAndLastDayOfMonth(id=5, DateTime=2024-03-01)
byyearday
The byyearday feature is similar to the bymonthday one.
# examples/schedule/byyearday.recipe.yml
- snowfakery_version: 3
- plugin: snowfakery.standard_plugins.Schedule
- object: ThirdDayOfYear
  count: 5
  fields:
    DateTime:
      Schedule.Event:
        start_date: 2024-01-01
        freq: yearly
        byyearday: 3

- object: ChristmasDayNewYearsEve
  count: 5
  fields:
    DateTime:
      Schedule.Event:
        start_date: 2024-01-01
        freq: yearly
        byyearday: -7,-1
Which generates:
# examples/schedule/byyearday.recipe.out
ThirdDayOfYear(id=1, DateTime=2024-01-03)
ThirdDayOfYear(id=2, DateTime=2025-01-03)
ThirdDayOfYear(id=3, DateTime=2026-01-03)
ThirdDayOfYear(id=4, DateTime=2027-01-03)
ThirdDayOfYear(id=5, DateTime=2028-01-03)
ChristmasDayNewYearsEve(id=1, DateTime=2024-12-25)
ChristmasDayNewYearsEve(id=2, DateTime=2024-12-31)
ChristmasDayNewYearsEve(id=3, DateTime=2025-12-25)
ChristmasDayNewYearsEve(id=4, DateTime=2025-12-31)
ChristmasDayNewYearsEve(id=5, DateTime=2026-12-25)
byhour, byminute, bysecond
The byhour, byminute and bysecond features work similarly to the features
above, but with datetimes. The numbers used must be positive integers.
# examples/schedule/bytimes.recipe.yml
- snowfakery_version: 3
- plugin: snowfakery.standard_plugins.Schedule
- object: Hours
  count: 5
  fields:
    DateTime:
      Schedule.Event:
        start_date: 2024-01-01T12:01:01
        freq: hourly
        byhour: 0,2,4 # early morning hours

- object: Minutes
  count: 10
  fields:
    DateTime:
      Schedule.Event:
        start_date: 2024-01-01T12:01:01
        freq: minutely
        byminute: 1,2,3 # first few minutes of each hour

- object: Seconds
  count: 10
  fields:
    DateTime:
      Schedule.Event:
        start_date: 2024-01-01T12:01:01
        freq: secondly
        bysecond: 1, 2, 3 # first few seconds of each minute
# examples/schedule/bytimes.recipe.out
Hours(id=1, DateTime=2024-01-02T00:01:01+00:00)
Hours(id=2, DateTime=2024-01-02T02:01:01+00:00)
Hours(id=3, DateTime=2024-01-02T04:01:01+00:00)
Hours(id=4, DateTime=2024-01-03T00:01:01+00:00)
Hours(id=5, DateTime=2024-01-03T02:01:01+00:00)
Minutes(id=1, DateTime=2024-01-01T12:01:01+00:00)
Minutes(id=2, DateTime=2024-01-01T12:02:01+00:00)
Minutes(id=3, DateTime=2024-01-01T12:03:01+00:00)
Minutes(id=4, DateTime=2024-01-01T13:01:01+00:00)
Minutes(id=5, DateTime=2024-01-01T13:02:01+00:00)
Minutes(id=6, DateTime=2024-01-01T13:03:01+00:00)
Minutes(id=7, DateTime=2024-01-01T14:01:01+00:00)
Minutes(id=8, DateTime=2024-01-01T14:02:01+00:00)
Minutes(id=9, DateTime=2024-01-01T14:03:01+00:00)
Minutes(id=10, DateTime=2024-01-01T15:01:01+00:00)
Seconds(id=1, DateTime=2024-01-01T12:01:01+00:00)
Seconds(id=2, DateTime=2024-01-01T12:01:02+00:00)
Seconds(id=3, DateTime=2024-01-01T12:01:03+00:00)
Seconds(id=4, DateTime=2024-01-01T12:02:01+00:00)
Seconds(id=5, DateTime=2024-01-01T12:02:02+00:00)
Seconds(id=6, DateTime=2024-01-01T12:02:03+00:00)
Seconds(id=7, DateTime=2024-01-01T12:03:01+00:00)
Seconds(id=8, DateTime=2024-01-01T12:03:02+00:00)
Seconds(id=9, DateTime=2024-01-01T12:03:03+00:00)
Seconds(id=10, DateTime=2024-01-01T12:04:01+00:00)
Intervals
We can schedule events for "every third week" or "every second month" using an interval:
# examples/schedule/every_third_week.recipe.yml
- snowfakery_version: 3
- plugin: snowfakery.standard_plugins.Schedule
- object: Meeting
  count: 5
  fields:
    Name: Halloween
    Date:
      Schedule.Event:
        start_date: 2023-01-01
        freq: weekly
        interval: 3
Which generates:
# examples/schedule/every_third_week.recipe.out
Meeting(id=1, Name=Halloween, Date=2023-01-01)
Meeting(id=2, Name=Halloween, Date=2023-01-22)
Meeting(id=3, Name=Halloween, Date=2023-02-12)
Meeting(id=4, Name=Halloween, Date=2023-03-05)
Meeting(id=5, Name=Halloween, Date=2023-03-26)
We can also combine features, for example to get every second Monday:
# examples/schedule/every_other_monday.recipe.yml
- snowfakery_version: 3
- plugin: snowfakery.standard_plugins.Schedule
- object: Meeting
  count: 5
  fields:
    Date:
      Schedule.Event:
        start_date: 2023-01-01
        freq: weekly
        interval: 2
        byweekday: MO
Which generates:
# examples/schedule/every_other_monday.recipe.out
Meeting(id=1, Date=2023-01-02)
Meeting(id=2, Date=2023-01-16)
Meeting(id=3, Date=2023-01-30)
Meeting(id=4, Date=2023-02-13)
Meeting(id=5, Date=2023-02-27)
For-each and Until
We can use the for_each and until features to loop over scheduled events
and generate the correct number of rows to match them:
# examples/schedule/for_each_date.recipe.yml
- snowfakery_version: 3
- plugin: snowfakery.standard_plugins.Schedule

- object: Mondays
  for_each:
    var: Date
    value:
      Schedule.Event:
        start_date: 2025-01-01
        freq: weekly
        until: 2025-03-01
  fields:
    Date: ${{Date}}
This would generate this data:
# examples/schedule/for_each_date.recipe.out
Mondays(id=1, Date=2025-01-01T00:00:00+00:00)
Mondays(id=2, Date=2025-01-08T00:00:00+00:00)
Mondays(id=3, Date=2025-01-15T00:00:00+00:00)
Mondays(id=4, Date=2025-01-22T00:00:00+00:00)
Mondays(id=5, Date=2025-01-29T00:00:00+00:00)
Mondays(id=6, Date=2025-02-05T00:00:00+00:00)
Mondays(id=7, Date=2025-02-12T00:00:00+00:00)
Mondays(id=8, Date=2025-02-19T00:00:00+00:00)
Mondays(id=9, Date=2025-02-26T00:00:00+00:00)
Inclusions
You can combine event schedules using a parameter called include.
Includes can be either simple dates or other schedules:
# examples/schedule/inclusions.recipe.yml
- snowfakery_version: 3
- plugin: snowfakery.standard_plugins.Schedule

- object: MonthlyEventsPlusValentines
  count: 10
  fields:
    MonthlyEvent:
      Schedule.Event:
        start_date: 2025-02-01
        freq: monthly
        include: 2025-02-14

- object: MonthlyEventsPlusSeveralNewYears
  count: 10
  fields:
    MonthlyEvent:
      Schedule.Event:
        start_date: 2025-02-01
        freq: monthly
        include:
          Schedule.Event:
            count: 3
            freq: yearly
            start_date: 2000-01-01
You can nest Schedule.Events inside of each other to build multi-part
inclusions.
This complicated example includes yearly events starting January 1, Monthly events in 2027 and daily events in December 2028. The total number of events that will be created are 15.
# examples/schedule/deep_inclusions.yml
- snowfakery_version: 3
- plugin: snowfakery.standard_plugins.Schedule
- object: TheEvent
  count: 15
  fields:
    MonthlyEvent:
      Schedule.Event:
        start_date: 2025-01-01
        freq: yearly
        include:
          Schedule.Event:
            count: 3
            freq: monthly
            start_date: 2027-03-01
            include:
              Schedule.Event:
                count: 5
                freq: daily
                start_date: 2028-12-01
Exclusions
Exclusions are the opposite of inclusions. They filter out dates from their parent schedule. For example, we can filter out just the event on May 1, 2025:
# examples/schedule/exclusions_no_May.recipe.yml
- snowfakery_version: 3
- plugin: snowfakery.standard_plugins.Schedule
- object: MonthlyEventsExceptMay
  count: 12
  fields:
    MonthlyEvent:
      Schedule.Event:
        start_date: 2025-02-01
        freq: monthly
        exclude: 2025-05-01
This one filters out the three events from the summer months of 2025:
# examples/schedule/exclusions_no_summer.recipe.yml
- snowfakery_version: 3
- plugin: snowfakery.standard_plugins.Schedule

- object: MonthlyEventsExceptSummer
  count: 10
  fields:
    MonthlyEvent:
      Schedule.Event:
        start_date: 2025-02-01
        freq: monthly
        exclude:
          Schedule.Event:
            start_date: 2025-05-01
            until: 2025-08-01
            freq: monthly
Make sure that exclusions use the same timezone as their base schedule, and if
you are using datetimes, make sure that they are exactly aligned down to the
second or fraction of a second.
Other scheduling references
Snowfakery's event mechanism is based on the
iCalendar specification and the dateutil library, so some subtleties may be inferred
from the documentation for those technologies.
Use Snowfakery with Salesforce
Snowfakery recipes that generate Salesforce records are like any other Snowfakery recipes, but instead use SObject names for the objects. There are several examples in the Snowfakery repository.
Salesforce-specific patterns and tools are described in Use Snowfakery with Salesforce
Snowfakery 3
Moving to Snowfakery 3 might require you to make very minor updates to a few recipes. In Snowfakery 2, all formulas are evaluated to either a string or number. In Snowfakery 3, other types are possible.
In most cases, this will enable things that were previously difficult or impossible. For example, this recipe does relative date calculations between fields:
- snowfakery_version: 3
- object: OBJ
  fields:
    basedate: ${{datetime(year=2000, month=1, day=1)}}
    dateplus: ${{basedate + relativedelta(years=22)}}
Note the snowfakery_version declaration which triggers the
Snowfakery 3 interpretation of the recipe. Becauses of this
interpretation basedate is a datetime, rather than a
string.
In very obscure cases this might cause changes in the meaning of a recipe which depended on values being flattened to strings. For example, a recipe might append a string to a date, which would generate an error in Snowfakery 3.
These errors are expected to be rare, but you can validate your
own recipes by adding the snowfakery_version: 3 declaration.
In June of 2022, Snowfakery 3 formula interpretation will
become the default. You should test all your recipes with
the snowfakery_version: 3 declaration before then, so that
you have time to fix any recipes needed.
Appendices
Snowfakery Glossary
- Object: A type of data, or in this case a row of data, that represents real-world entities like people, places, or things. See also: Rows.
- Object Template: Instructions on how to create a row, or multiple rows, in a database. Each row represents a real-world object.
- Rows: A unit of related information to an object listed in a database, often called records. For example, in Salesforce (which includes a database) a
Contactrecord has a first name, last name, phone number, and so on. In a database eachContactis listed as a separate row.Contactis the object type of each of those rows, and rows represent real-world objects. See also: Objects. - Recipe: A Snowfakery YAML file that instructs Snowfakery on what to generate.
- Iteration: Snowfakery recipes can be "scaled up" to generate more data when executed over and over again. These executions are called iterations.
- Singleton: A singleton is an Object Template that generates a single row regardless of how many times the recipe is iterated.
- YAML: A relatively simple, human-readable format. Learn more at yaml.org.
Appendix: Security Profile of Snowfakery
Snowfakery is a domain-specific programming language with access to most of the power of Python. It can load Python plugins and call Python methods. It's unwise to run untrusted recipes in an environment that has access to secure resources, such as passwords, network connections, and so on.
Appendix: The Age Old Puzzle
# snowfakery/docs/examples/st_ives.yml
# As I was going to St. Ives,
# I met a man with seven wives,
# Each wife had seven sacks,
# Each sack had seven cats,
# Each cat had seven kits:
# Kits, cats, sacks, and wives,
# How many were there going to St. Ives?
#
# https://en.wikipedia.org/wiki/As_I_was_going_to_St_Ives
- snowfakery_version: 3
- object: narrator
- object: man
  fields:
    wives:
      - object: woman
        count: 7
        fields:
          husband:
            reference: man
          luggage:
            - object: sack
              count: 7
              fields:
                holder:
                  reference: woman
                contents:
                  - object: cat
                    count: 7
                    fields:
                      container:
                        reference: sack
                      offspring:
                        - object: kit
                          count: 7
                          fields:
                            parent:
                              reference: cat
- object: stats
  fields:
    num_narrators: ${{ man.id }}
    num_men: ${{ man.id }}
    num_women: ${{ woman.id }}
    num_sack: ${{ sack.id }}
    num_cat: ${{ cat.id }}
    num_kittens: ${{ kit.id }}
    everyone: ${{  num_men + num_narrators + num_women + num_sack + num_cat + num_kittens }}
    going_to_st_ives: ${{ num_narrators }}
What does it output as its last row?
This (incomplete) picture probably won't help....